Running Home Assistant Open Source home automation locally offers great advantages, such as optimizing your own energy usage or to simply automate boring and repetitive tasks.
In case you own a Synology network disks, such as the Synology Diskmanager DS218+ you can directly run Docker containers on your local network disk and therefore also run Home Assistant or any kind of server directly on your own local NAS.
Once you run some of your servers or services on your local NAS, the question arises if you allow yourself to access those services from the public internet.
Opening the access to your local network from the public internet is generally not recommended due to all the security risks that go along with that decision.
On the other hand, what’s the benefit of having a home automation system, a security camera and a network storage if you can’t use it from anywhere other than within your local network?
The next sections explain how you can expose single services to the public and how to correctly secure them by using HTTPS and the Synology Reverse Proxy service.
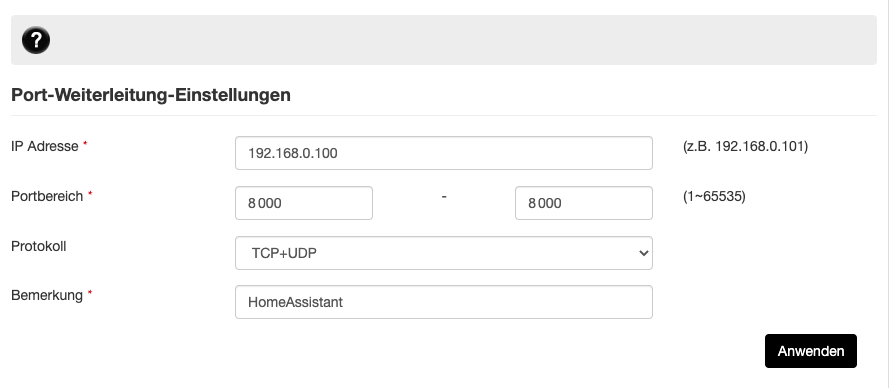
Step 1: Define a Port Forwarding Rule
Public access to your local services is controlled through your local router, which typically contains a minimal firewall setting and a setting called ‘Port Forwarding’ which allows you to control which incoming network port should be routed to which local network IP address.
Let’s say you want to expose the Home Assistants TCP port 8123 to the public internet and the local network IP address of your Home Assistant server is 192.168.0.100, you need to specify that within the port forwarding rules of your own router, as it is shown below.
Please mind that as I don’t want to directly expose the unencrypted TCP port 8123 to the public internet, I open a port 8000 instead that receives the HTTPS encrypted traffic instead.
Then I use the Synology Drive to terminate the encrypted HTTPS traffic by using one of the Synology TrueCrypt certificates (described in detail in a section below) and forward the unencryped HTTP traffic then to the local port 8123 of my Home Assistant container. This is the reason why the port forwarding rule in my router firewall is configured to open the port 8000, as shown below.
Please mind here that the UI and configuration of course looks different for your own local router, but the basic information is always the same as shown below:
After a port forwarding rule is correctly defined in your local router, you can take the dynamic public IP address that your internet router is assigned from your internet provider and try to access the address ‘http://<your_dynamic_public_ip>:8000‘ from outside your network.
Step 2: Use the Synology Dynamic Domain Name for Access
As the public IP address is dynamically assigned to your router and can change over time, it’s necessary to use a permanent dynamic domain name and to actively update that dynamic domain name (DynDNS) with your currently assigned IP address.
Varies dynamic DNS providers such as DuckDNS or DynDNS offer a nearly free service of creating your own dynamic domain name and to assign it to your local network IP address.
A much more convenient way comes along with the Synology NAS, as Synology automatically registers a specific domain name (quickconnect and synology.me) for accessing your Synology disk.
Those Synology assigned domain names are:
- <your_own_identifier>.synology.me
- <your_own_identifier>.direct.quickconnect.to
Using any of those two already registered DNS names, you can directly access your own Home Assistant server by typing http://<your_own_identifier>.synology.me:8000 into your browser from anywhere on the public internet.
This is pretty convenient, but it opens a huge security issue! As the communication with Home Assistant through port 8123 is running through plain unencrypted HTTP calls, everybody can intercept your access credentials if you login from any public wifi.
As this is not a situation you want to have, you need to take the next step and secure the communication by either using a VPN dial in or more conveniently to configure the access through HTTPS.
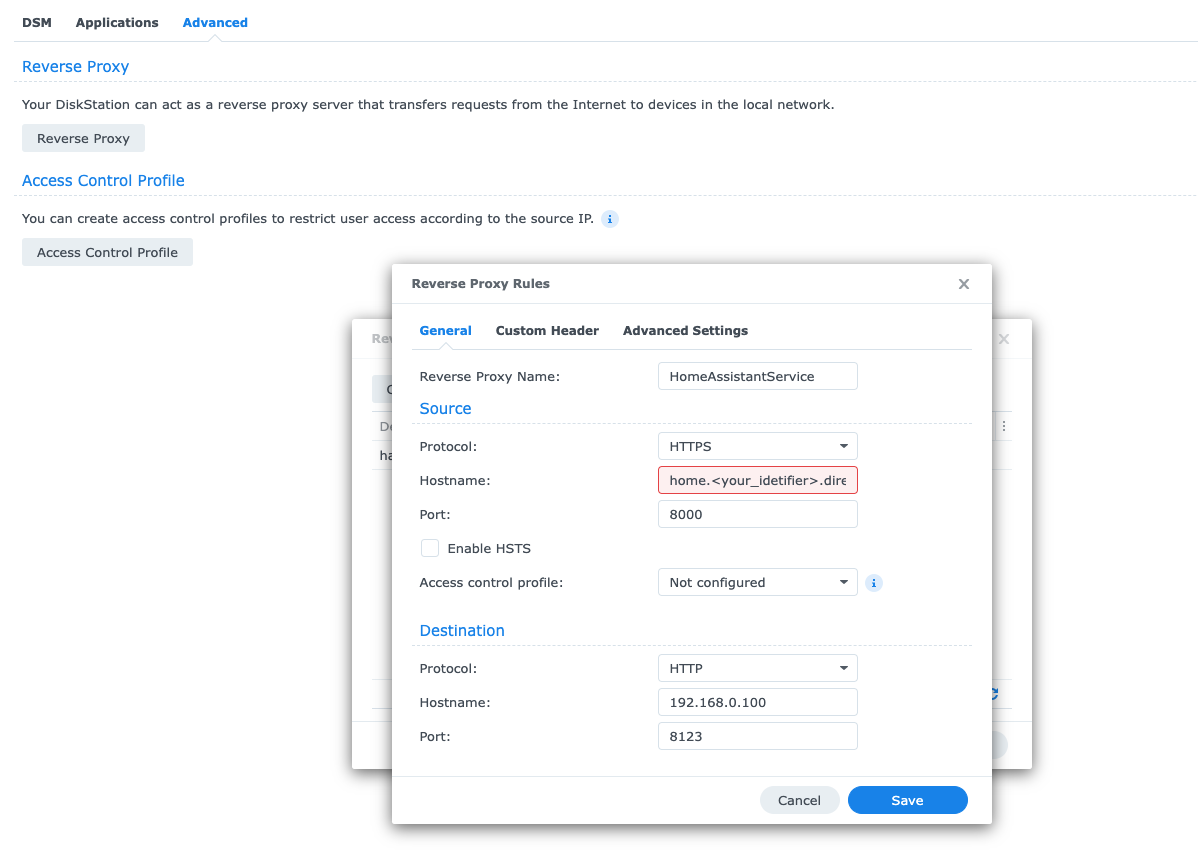
Step 3: Use the Synology Reverse Proxy to enable HTTPS encryption
The Synology NAS offers a convenient reverse proxy that allows you to register a local domain name and to map it to any server and port within your local network.
Let’s say you want to expose your Home Assistant system through a specific subdomain called ‘home.<your_own_identifier>.direct.quickconnect.to’ you can set up a specific reverse proxy rule on your Synology NAS for that.
Additionally, the reverse proxy allows you to also map incoming HTTPS connections to a local non-encrypted HTTP connection.
So, for the outside internet world, the incoming connection is secured and encrypted by using the certificate that was already assigned by Synology, which is the root domain ‘*.direct.quickconnect.to’.
See below how to configure a HTTPS mapping rule within your Synology NAS.
Within your Synology NAS navigate to >Control Panel > Login Portal > Advanced > Reverse proxy and create a new rule as shown below:

Click on the ‘Reverse Proxy’ button and add a new rule for your own subdomain as shown below:
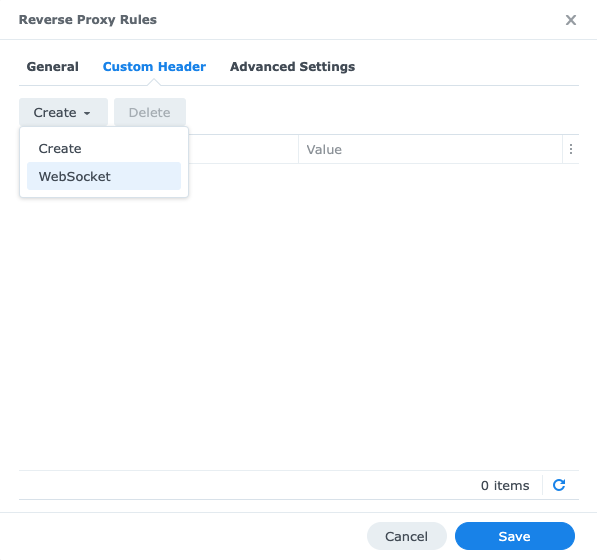
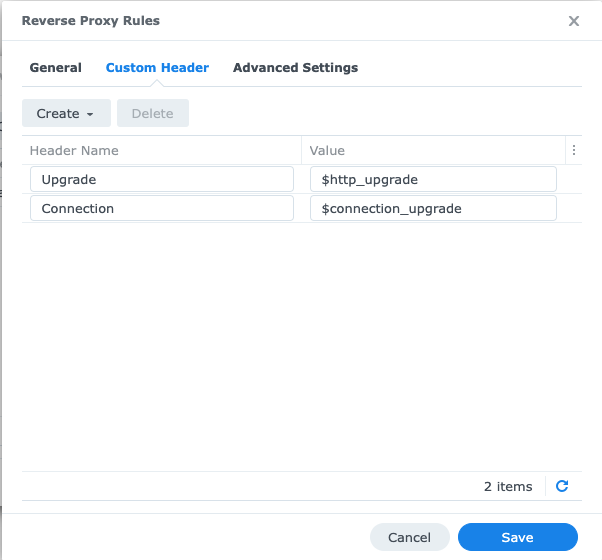
Click on the ‘Custom Header’ tab and add a ‘Websocket header’ as shown below:
That’s it. Once this reverse proxy rule is configured at your local Synology NAS you can access your own subdomain by using HTTPS instead of the unencrypted HTTP protocol.
But first we still have to assign the correct domain certificate to your chosen subdomain, as it is explained in the next section.
Step 4: Assign the correct certificate to your subdomain
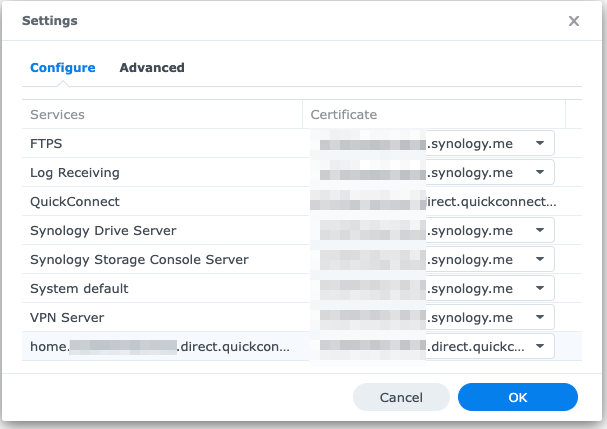
Within your Synology NAS navigate to the > Security > Certificates settings within your control panel, as it is shown below:
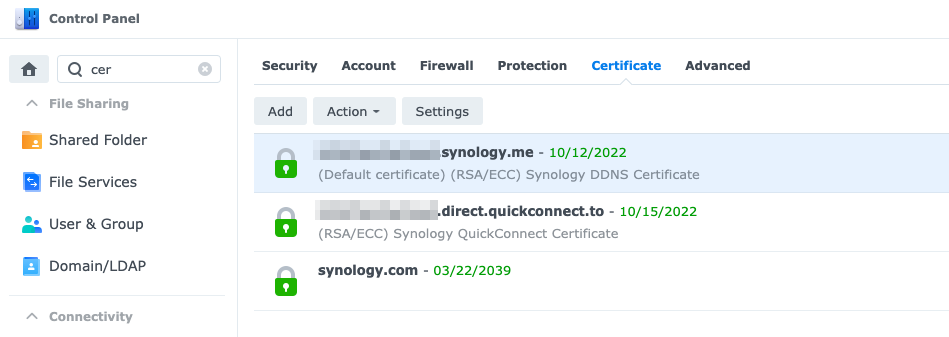
Enter the settings and assign the correct root certificate (it’s already existing in the dropdown as ‘direct.quickconnect.to’) to your newly created subdomain ‘home.<your_identtifier>.direct.quickconnect.to.
Step 5: Configure Home Assistant to use a trusted Proxy
Now as the last step, we must tell Home Assistant that a HTTP forwarding is allowed and that the Synology local IP is a trusted proxy.
This can be done by simply adding a HTTP config section within your existing Home Assistant configuration.yaml file as shown below:
http:
 use_x_forwarded_for: true
 trusted_proxies:
   - 192.168.0.100   # Add the local IP address of your Synology NAS
After this last configuration step is finished, you can try access your local Home Assistant server from public internet by typing in the HTTPS address of your newly created subdomain, as it is shown below:
“https://home.<your_identifier>.direct.quickconnect.to:8000”
If everything went correct, you will see the tiny lock icon within your browser that indicates that the connection is successfully encrypted and that the correct, trusted domain certificates were used.
Summary
Opening the door for accessing services such as your home control system from the public internet is a tremendously risky thing to do.
At least you should secure the access by using strong passwords along with a proper HTTPS encryption and with a trusted DNS security certificate so that others cant sniff your credentials.
By using the Synology Reverse Proxy you can easily use the same Synology NAS device to run your own services on different network ports and to map incoming HTTPS connections directly to your local, unencrypted network ports.