
With hundreds of unique, cryptic passwords to manage we all have to admit that we are overwhelmed with today’s security requirements.
Password safes along with two factor authentication (2FA) promises some help to organize those large numbers of auto-generated passwords.
As Web based password safes became pretty popular for obvious reasons, they also represent a valuable target for hackers.
Too often popular online password safes are targets for serious data breaches or vulnerabilities, as LastPass reported a security incident in December 2022, Keeper was the target of a vulnerability and security researches of the University of York uncovered vulnerabilities in several commercial password managers such as LastPass, Dashlane, Keeper, 1Password, and RoboForm.
With those incidents in the back of my mind, I wanted to run my own password safe locally on my Synology NAS in order to avoid sharing my secrets with a vulnerable vendor.
Run a password safe locally
My research led me to two open source password safes that seemed to be trustworthy and widely popular, which are Bitwarden and Vaultwarden. Actually, Vaultwarden is a clone, or better a lightweight rewrite of the original Bitwarden server in RUST.
Bitwarden as well as Vaultwarden are available as open source software and both can be run as Docker containers, which is a crucial requirement for running it on my Synology NAS.
After trying to install and run Bitwarden, I found its dependencies too cumbersome to manage on my Synology NAS and I switched to using the Vaultwarden Docker container instead.
The Vaultwarden Docker container includes all the dependencies and can be started directly on your Synology network disk without the need to run a separate web server.
Download Vaultwarden Container
The first step to run Vaultwarden on your Synology Disk is to install the Docker package within your Synology package manager, as shown below:

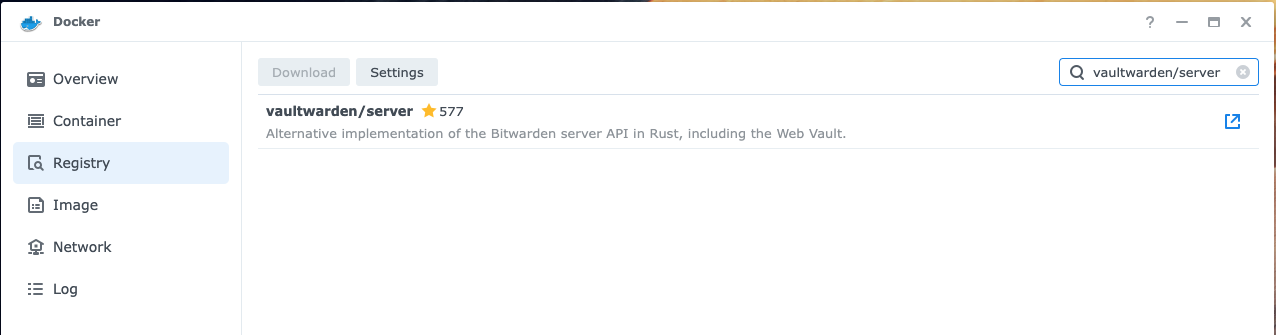
Then open the Docker package and download the Vaultwarden Docker image from Dockerhub as it is shown below:
Before we start the Docker container we need to create a local folder within the Synology Disk that will store all the Vaultwarden data.
Create a data directory
On your Synology Disk create a folder named /vaultwarden which we will then mount during the startup of your vaultwarden container.
Start Vaultwarden Container
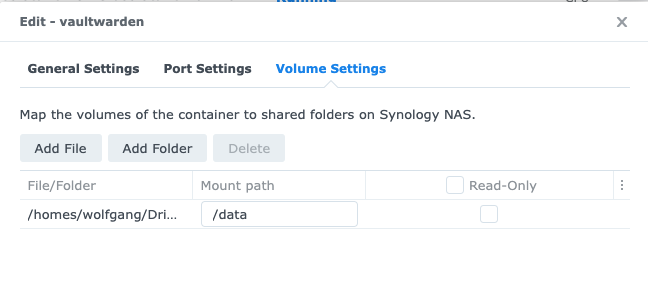
Now switch back to the Docker package UI and start the Vaultwarden container. We click on the volume mount options and mount the local /vaultwarden folder with the containers folder /data, as it is shown below:
We also map the container’s local 80 web port to the port 8080 on our Synology NAS to not clash with any other servers running on my NAS.

Access the Vaultwarden Web UI
Now that you have started your own Vaultwarden Docker container directly on your Synology NAS you can access the Web UI by browsing to port 8080 on your local NAS IP.

Unfortunately, you can’t access the Vaultwarden locally yet as you will see, as most modern browsers restrict access to crypto libraries when they are not run behind HTTPS encryption. See the error message below that you get when accessing Vaultwarden or also Bitwarden without proper HTTP connection:

“This browser requires HTTPS to use the web vault. Check the Vaultwarden wiki for details on how to enable it”.
As a matter of fact, this is not really an error but a restriction that you can’t and should not overcome, as those security and crypto functions should not be run without proper HTTPS certificates and encryption.
Luckily, Synology DiskManager offers a convenient reverse proxy align with a valid domain and certificates that allow you to run any of your local Docker servers through your Synologies secured connection.
Learn how to set up that Synology reverse proxy by referring to my Blog post on ‘Secure your Home Assistant with HTTPS using Synology Reverse Proxy’.
Disable User Registration
Don’t forget to disable new user registration on your Vaultwarden container once you created all your local users. Otherwise external strangers could use your password safe as well, which is probably not what you want.
You can disable new user registration by setting following Docker environment variables:
- SIGNUPS_ALLOWED=false
See below:

Summary
Running your own password safe directly on your local Synology network disk helps you to keep your secrets safe and under local control.
Running a Vaultwarden docker container directly on your Synology NAS is convenient alternative to the more complex Bitwarden original and by using Synology Reverse Proxy you can also directly secure your connection through HTTPS and a valid certificate without the need to register a separate domain and security certificate.