Over the last months, I became more and more addicted to Home Assistant (Hass.io) and MQTT low cost wireless sensors. I was already familiar with several home and industrial automation systems that all come with a certain hardware (and price) and build upon a completely proprietary software stack. So long story short, I was searching for a good community-backed open source home automation system that is easy to set up and runs on my old Raspberry.
As home automation seems to be a broad area of interest I thought there should be hundreds of open source community projects out there. I was not as easy as I thought and there are not so many home automation projects out there. It seems as if the market is broadly dominated by large vendors that offer integrated solutions.
After some cumbersome fails I was finally able to find a real gem in the home automation area, which is called the Home Assistant, or short Hass.io. Home Assistant comes as a lightweight installation that perfectly fulfills following requirements:
- Its lightweight, low resource consuming
- Easy to set up
- Nice web interface, that also comes pretty well with my tablet and smartphone (no app required, responsive web UI is great on your mobile device too) See a live demo here.
- Lots of community components available (>1000), such as Alexa, IFTTT, Hue, Sonos, Cromecast, Webcam, and many more.
- Fully configurable through plaintext YAML files
- It comes with an integrated MQTT broker!
- Supports automation scripts, such as turn light on at sunset
- Best of all its written in Python and its open source
The first step towards building my own MQTT wireless weather station was to set up a Home Assistant instance on my old Linux laptop. If you already got Python3 running on your system, the set up process is pretty straight forward, just type:
python3 -m pip install homeassistant
After successful installation you just enter the .homeassistant configuration folder and adapt the .yaml configurations that control what your Home Assistant instance is showing and how elements are organized in Web UI.
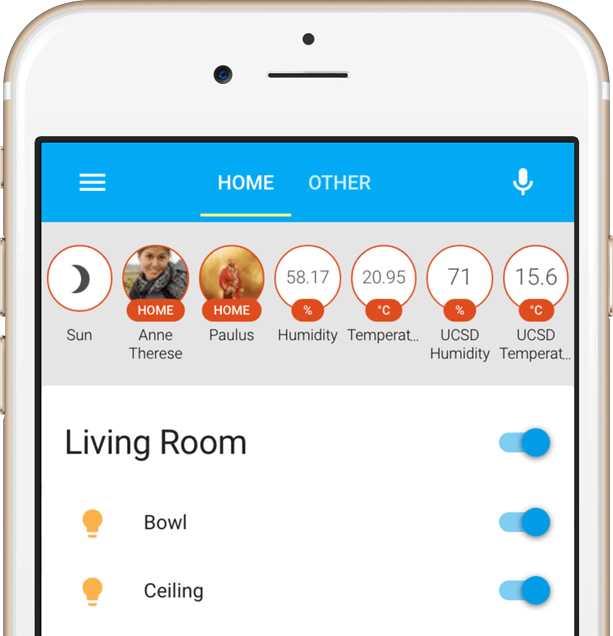
The most important configuration files are configuration.yaml that contains the core configuration about sensors and components and groups.yaml that groups all your components into visual tabs within the UI. Within my installation i chose to use a default group, one for my living room and one for controlling my pool, as i is shown in the screenshot below:

As my screenshot already shows, my Home Assistant instance already contains some MQTT based sensors for continuously informing me about the temperature and humidity (outside, and in living room). You can put the sensor output into any of your configured tabs. The same sensor info can also be present in multiple tabs at the same time.
To add a new MQTT sensor into your core configuration file, simply add following sensor section into your core configuration.yaml file:
sensor:
  - platform: mqtt
    name: "Temperature"
    state_topic: "/home/outdoor/sensor1"
    value_template: "{{ value_json.temperature }}"
    unit_of_measurement: '°C'
  - platform: mqtt
    name: "Humidity"
    state_topic: "/home/outdoor/sensor1"
    value_template: "{{ value_json.humidity }}"
    unit_of_measurement: '%'
You can then show this newly added sensor value in any of your configured groups, as shown below:
default_view:
  name: Home
  view: yes
  entities:
    - sensor.airquality
    - sensor.temperature
    - sensor.humidity
    - sensor.yr_symbol
    - sun.sun
    - camera.mjpeg_camera
    - device_tracker.alice
    - device_tracker.bob
    - switch.robby
    - switch.lamp
indoor:
  name: Livingroom
  view: yes
  entities:
    - sensor.temperaturelivingroom
    - sensor.humiditylivingroom
    - media_player.livingroom
pool:
  name: Pool
  view: yes
  entities:
    - sensor.watertemperature
    - switch.poolcover
    - switch.poollight
    - switch.poolpump
    - switch.poolbot
Now its time to test if the sensor would show a value in case it receives an MQTT value through the configured MQTT topic. Therefore, Home Assistant offers a simple MQTT test message UI in which you can simulate any incoming MQTT message, as shown below. Just enter your MQTT topic and send a static value:

After a click on the ‘publish’ button those two values 30 and 70 will appear in your sensors for temperature and humidity. You can do that try-run for all of your MQTT bound sensors, which is a convenient feature for testing the server side functionality of your home automation.
Next step is to build a cheap temperature and humidity sensor that sends its measurements over WLAN to your Home Assistant MQTT broker. As base sensor board I decided to use an ESP8266 or an equivalent ESP32 microcontroller board that offers a cheap (~5 USD platform) with integrated WLAN stack and many digital and analog input pins. See below an image of the chosen Esp32 board:
The ESP8266 board can easily be flashed over a USB cable and it runs with a standard Arduino bootloader. You can use your Arduino Studio to program your tiny ESP8266 board. To measure the temperature and humidity, the combined digital DHT22 sensor was used, as shown below:


To connect the DHT22 sensor to your ESP8266 board simply attach the Vin pin to the 3V pin of the ESP8266 board, the Ground to any of the Ground pins and the signal pin to any of the ESP8266 digital input pins.
Following Arduino code snippet shows how to initialize the DHT22 sensor and how to read and report the sensor value through a MQTT message:
#include <ESP8266WiFi.h>
#include <EEPROM.h>
#include <DHT.h>
#include <DHT_U.h>
#include <PubSubClient.h>
#include <ArduinoJson.h>

/* Globals used for business logic only */
#define MQTT_VERSION MQTT_VERSION_3_1_1
// MQTT: ID, server IP, port, username and password
const PROGMEM char* MQTT_CLIENT_ID = "sensor2_dht22_s";
const PROGMEM uint16_t MQTT_SERVER_PORT = 1883;
// MQTT: topic
const PROGMEM char* MQTT_SENSOR_TOPIC = "/home/house/sensor1";
// sleeping time
const PROGMEM uint16_t SLEEPING_TIME_IN_SECONDS = 60; // 10 minutes x 60 seconds
// DHT - D1/GPIO5
#define DHTPIN 5

#define DHTTYPE DHT22

DHT dht(DHTPIN, DHTTYPE);
WiFiClient wifiClient;
PubSubClient client(wifiClient);

/* Business logic */
// function called to publish the temperature and the humidity
void publishData(float p_temperature, float p_humidity, float p_airquality) {
    // create a JSON object
    StaticJsonBuffer<200> jsonBuffer;
    JsonObject& root = jsonBuffer.createObject();
    // INFO: the data must be converted into a string; a problem occurs when using floats...
    root["temperature"] = (String)p_temperature;
    root["humidity"] = (String)p_humidity;
    root["airquality"] = (String)p_airquality;
    root.prettyPrintTo(Serial);
    Serial.println("");
    /*
    {
    "temperature": "23.20" ,
    "humidity": "43.70"
    }
   */
    char data[200];
    root.printTo(data, root.measureLength() + 1);
    client.publish(MQTT_SENSOR_TOPIC, data, true);
    yield();
}

setup() {
    dht.begin();
    Serial.print("INFO: Connecting to ");
    WiFi.mode(WIFI_STA);
    WiFi.begin(cconfig.ssid, cconfig.pwd);
    while (WiFi.status() != WL_CONNECTED) {
        delay(500);
        Serial.print(".");
    }
    Serial.println("");
    Serial.println("INFO: WiFi connected");
    Serial.println("INFO: IP address: ");
    Serial.println(WiFi.localIP());
    // init the MQTT connection
    client.setServer(cconfig.mqtt, MQTT_SERVER_PORT);
}


void loop() {
    dht.begin();

    if (WiFi.status() != WL_CONNECTED) {
        WiFi.mode(WIFI_STA);
        WiFi.begin(cconfig.ssid, cconfig.pwd);

        // Reading temperature or humidity takes about 250 milliseconds!
        // Sensor readings may also be up to 2 seconds 'old' (its a very slow sensor)
        float h = dht.readHumidity();
        // Read temperature as Celsius (the default)
        float t = dht.readTemperature();

        if (isnan(h) ||isnan(t)) {
            Serial.println("ERROR: Failed to read from DHT sensor!");
        }
        else {
            publishData(t, h, aq);
        }
        delay(5000);
    }
}
Download the full source code at Github.
After connecting, flashing and running our tiny 15 USD wireless sensor we will continuously receive updates of actual temperature and humidity measurements. Those measurements are shown within your Home Assistant views. A very nice feature of Home Assistant is also that it stores historic measurements and that you can get a chart of past trends by a single click into the UI, as shown below:

Overall, Home Assistant is the perfect open source platform for your own home automation projects, no matter if you run it on your old laptop or on a tiny Raspberry Pi. It offers all the flexibility in terms of attaching any kind of MQTT sensor or message provider and is a great platform for playing around with your electronics hardware and it has a cool Web UI too!
Read more in my ebook on ‘Open Source Home automation’.